
 [swift] 코드로 horizontal scrollView 만들어보기 번외편
오늘은 horizontal scrollView 2번째 입니다!지난 번에 굳이 이미지뷰를 3개 만들어 번거로웠더랬져?오늘은 배열에서 불러오도록 해볼게요. 일단 기본 레이아웃은 숨겨둘게요.더보기1. horizontal 방향이니까 contentView의 edges는 scrollView의 contentLayoutGuide에, height는 frameLayoutGuide에 맞출 것2. 사진을 3장 넣을 거라서 width의 UIScreen의 width의 3배3. scrollView의 view와 똑같이 맞춰도 되지만, 인스타 느낌처럼 조금 작게 해봄import UIKitimport SnapKitclass SecondHorizontalViewController: UIViewController { let scrol..
 [swift] stepper 및 alertController 연습하기 1 (in Code)
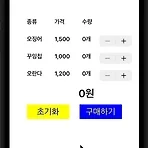
오늘은 오토레이아웃과 alertcontorller, stepper를 연습해볼 수 있었던 예제를 올려보도록 할게요. 생각보다 코드가 길어서 2~3편 정도에 나눠서 작성을 해야 할 것 같아요.ㅎㅎ 일단 가장 손이 많이 갔던 오토레이아웃 잡기부터 해보도록 할게요. 총 15개의 레이블과 2개의 버튼, 3개의 스텝퍼가 필요해요. ViewDidLoad에서 선언해줍니다요. // // ViewController.swift // AlertTest2 // // Created by 순진이 on 2021/11/08. // import UIKit class ViewController: UIViewController { let walletLbl = UILabel() let totalPrice = UILabel() let menu..
- Total
- Today
- Yesterday